For those of you who have an Arduino development board and wanted to code in embedded c and upload your code on the board, this is the right post.
For starters you need to download following components:
1. Arduino IDE Download Link
2. AVR Studio Download Link or AVRDUDE download
We shall be using AVRDUDE utility for burning our programs onto the micro-controller.
Once you’ve installed above programs. We can begin the setup of AVR studio using AVRDUDE for burning our programs.
First you must locate following two files:
- avrdude.exe : If you have installed Arduino IDE then a sample path for this file is as follows. C:\Program Files (x86)\Arduino\hardware\tools\avr\bin\avrdude.exe
- avrdude.conf : Similarly for Arduino IDE installation the path is as follows. C:\Program Files (x86)\Arduino\hardware\tools\avr\etc\avrdude.conf
If you are using AVRDUDE direct download, then these files shall be in the avrdude installation folder. example: C:\avrdude\avrdude.exe and C:\avrdude\avrdude.conf
We shall require both of these paths in the subsequent steps, so kindly ensure you’ve copied these two paths and kept it somewhere.
Next step is detecting which COM port your arduino board uses.
In my case the port used by the Arduino Board is COM3. Keep this information with you.
Now the AVRDUDE arguments is as follows:
- Arguments for Arduino Mega 2560
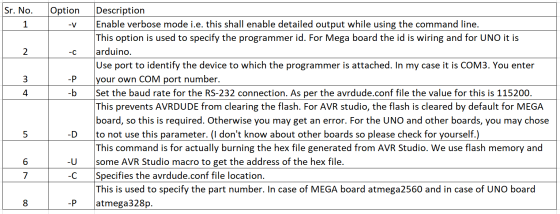
-v -patmega2560 -cwiring -P COM3 -b115200 -D -Uflash:w:"$(ProjectDir)Debug\$(TargetName).hex":i -C"C:\avrdude\avrdude.conf"
- Arguments for Arduino UNO
-v -patmega328p -carduino -P COM3 -b115200 -D -Uflash:w:"$(ProjectDir)Debug\$(TargetName).hex":i -C"C:\avrdude\avrdude.conf"
I shall explain few important command line options used in above commands. The detailed explanation for all the options is given in following documentation.
Now that we understand about the commands that shall be used, we can proceed with the creation of AVR Studio programmer.
Steps:
- Open AVR Studio.
- Under tools select external tools.
- Press add.
- Name your programmer in the Title field.
- Paste the appropriate arguments in the Arguments field.
- Paste the avrdude.exe file path without the quotation marks in the Command field.
- Check the ‘Use Output window’ box.
- Press OK.
Now you have your programmer available in the tools menu above the external tools sub-menu.
You can upload a LED blinking program to your board to check whether everything is working.
Steps for testing
- Create a new GCC executable project
- Make your main.c file
- Build the project so that the hex file is generated
- Go to Arduino Programmer in the tools menu and click on it
- You should get an output window
If everything works you will have the hello world blinking LED.
Hope you liked the post. If you found it useful, please like and share! Remember sharing is caring 🙂


